Tutorial on Designing Quilt Blocks in Photoshop
Here is a step by step on how I design quilts and quilt blocks in photoshop.
Step 1: Use grid paper to design your block or quilt on.
Found a great resource online for grid paper. I choose style and measurements then download grid paper in pdf format that i want to work with from Incompetech.com and print a few copies to have on hand. The measurements I enter for the grid will depend on if I’m designing a block or a quilt. Choose more squares per inch (usually chose 4 per inch) when designing the quilt which will give you a wide angle view. Enter 1 or 2 squares per inch when designing a close up of a block. Select measurements and download the grid paper here
Here are some examples of quilt ideas I drew on the grids:

Step 2: Choose your fabric for your block and scan them at 150dpi for the ideal resolution
I went through my stash and chose all the fabrics I thought would work. I threw in a couple extra to scan so I could try them out in the design.

Next, also scan the grid drawing of your block at 150 dpi as well.
�
Step 3: Open the scan file of your grid drawing design and all of the fabrics in photoshop.

Step 4: Prepare your fabric piece images
There is a small amount of preperation with your fabric pieces before proceeding. You’ll need to open them all in photoshop, and then crop them to 4 inches x 4 inches. This will make the scan files smaller and easier to work with and keep the scale of the design at least closer to the way they will look when pieced and sewn together.
Here is how to proceed:
1. Open the fabric scan files.

2. Go to the menu at the top and select ‘Image > Canvas Size’. As seen below, be sure to select the upper left corner as the ‘anchor’, enter 4’s into the width and height fields, and be sure that ‘inches’ is selected. Then hit ‘ok’ to proceed.

You don’t have to save the fabrics once you resize them, you can simply leave them open and just minimize them. However if you don’t trust your photoshop to ‘crap out’ after all the work (oh it’s happen to me alright)…i would advise then to be sure and save out your pieces as you go along. Saving them as .PSD (photoshop document) is fine.
Step 5: Create vector shapes overtop your block design
In this step, we are ready to start moving the fabrics over to the drawing to begin designing the block.
1. Open your drawing and bring up one of the cropped fabric scans in photoshop.
Windowed files: Be sure that you can see each window at the same time as detailed in the screenshot below. If your file windows are tabbed (CS4) or by default full sized, go to ‘Window > Arrange > Cascade’. This will place all the windows (files you have open) that are not minimized to cascade one in front of the other. Here you will be able to minimize the files you do not currently want to work with and see only the two windows you need at the moment.

2. From your tools panel, choose the ‘Rectangle Tool’.
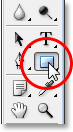
Starting at the upper left corner of the block (in this case we are starting with the center block), place your cursor at that point, hold the left ‘SHIFT’ key (which retains ratio for a perfect square), click and drag down to the lower right corner. Release your left mouse button FIRST before releasing ‘SHIFT’ as this might skew the shape. You should see on the right hand side in your layers panel a layer called ‘Shape 1’. This step defines the areas you want to designate a fabric to. Next, we can apply a ‘clipping mask’.

Step 6: Create a clipping mask for your fabric.
Here is why you needed both window files open and viewable at the same time. To get the fabric scan over to your design, be sure you have the ‘move’ tool selected:
Then click and hold your mouse anywhere on the fabric file, and start dragging across the window until your cursor is over your design file window. Then release your left mouse button. If all went successfully, your fabric piece should now be in a new layer in your design file as seen below.

Step 7: Apply Clipping Mask of fabric overtop a vector shape
Notice the layers panel on the right. Be sure your fabric layer is above your vector shape layer. Then you can either ‘right click’ your fabric layer or go to ‘Layer > Create Clipping Mask’.

As seen in the screenshot below, this will will crop away any of the fabric scan that goes outside the vector shape you defined in step 5. Notice the layers panel on the right, a clipping mask is specified by a small arrow that appears to the left of the preview on the fabric layer. It’s pointing down to the vector shape telling me that is the shape it’s cropping too.
“My fabric is not in view or not covering the entire vector shape?” If this either of these things occur, all you need to do is have your ‘move tool’ selected from your tools, make sure the ‘fabric layer’ is selected that you are having trouble with in your layers panel, then on the design file click anywhere and drag around as this will ‘grab’ your fabric file and move it around until the fabric either comes in view or is displaying completely over the shape.

Step 8: Repeat steps 5, 6, and 7 until you cover all remaining areas with vector shapes and the fabric to cover your entire piece.

Here is a finished block.

“How do I make the triangles?”
For the triangles, it’s a matter of drawing your vector shape, then removing one of the ‘handles’ or shape points to become a triangle.
1. Draw your vector shape.

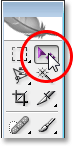
2. Hold left CTRL button and click on the OUTLINE of your vector shape. If you do this correctly, you’ll see some small grey squares appear at all corners of the vector shape.
3. Next, you’ll need to select your ‘Pen Tool’ from your tools palette:

Then, hover over the lower right small grey handle or shape point where the pen tool should change to the cursor (see pen tool menu above) the ‘Delete anchor point tool’. Click on the grey point and hit ENTER to accept the change. The handles will go away. As seen in the image below, your square will now be a triangle.

To make things easier, you can duplicate this triangle vector shape and move it/rotate it around to overlay other points of your design.

If you have any questions about any of the steps above, please feel free to leave me a comment.
Thanks for visiting!
January 10, 2012 @ 11:48 AM
This was super helpful! Thanks for the great tutorial!
January 15, 2012 @ 8:33 PM
You’re very welcome!